 My Blog
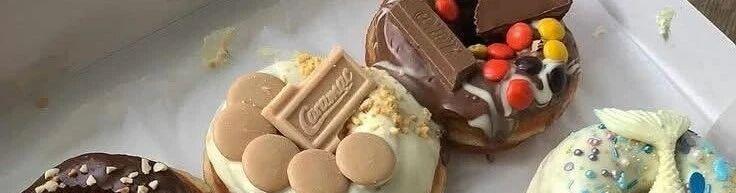
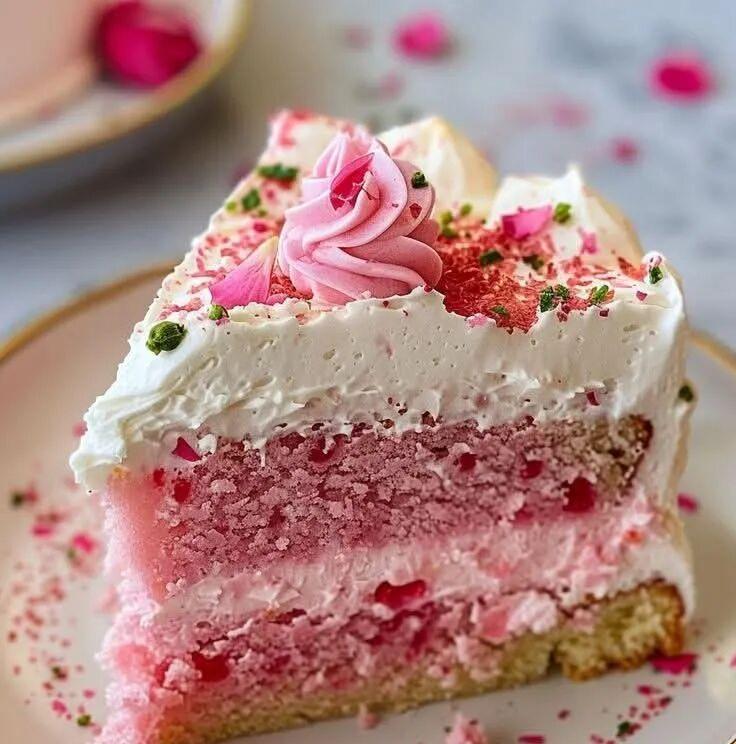
✨ 🍰 Rose milk cake 🍰 ✨ ✨
✅ Ingredients:
✨ To make the cake:
-2 cups medium gluten flour.
-1 ½ tsp baking powder.
-½ teaspoon baking soda
-¼ teaspoon salt
-¾ cup unsalted butter (room temperature)
-1 ¼ cup sugar
-3 large eggs
-1 teaspoon vanilla extract
-½ teaspoon rose essence
-¾ ‘s cup of warm milk
-2 tablespoons rose milk (optional)-3 tablespoons rose milk (optional)
-Pink food coloring (according to personal taste)
✨ To make rose milk syrup:
-½ cup condensed milk
-half a cup of evaporated milk
-½ cup coconut milk or regular milk
-half a teaspoon of rose essence
2 tablespoons rose milk (optional)-pink food coloring (optional)
-Pink food coloring (optional)
✨ Ingredients Cream:
-1 ½ cup whipped cream
-3 tablespoons rock sugar
-half a teaspoon of rose essence
✨ Decoration:
-Edible rose petals
-Pink or golden peas
-Meringue or rose cream.
-Chopped pistachios (optional)
✅ Preparation:
✨ Prepare the sponge cake.
-Preheat oven to 170 °C (340 ° F).
-Grease and flour the cake tin.
-Sift the flour, baking powder, baking soda and salt.
-Cream together the butter and sugar until creamy.
-Add eggs one by one and beat well.
-Add vanilla extract and rose extract.
-Add flour and milk and stir well.
-Add pink pigment and mix well.
-Pour the mixture into the mold and bake for 30-35 minutes.
-Allow to cool and remove.
✨ Prepare the rose milk syrup.
-Mix three kinds of milk with rose essence and pink pigment.
-Stab the sponge cake with a fork and slowly pour in the syrup.
-Refrigerate for at least 1 hour to allow it to be fully absorbed.
✨ Make the ingredients cream.
-Whip the whipped cream with rock sugar and rose essence until a soft peak is formed.
✨ Garnish and serve.
-Cover the cake with whipped cream.
-Garnish with rose petals, sprinkles and pistachios.
Add meringue or rose cream.
-Refrigerate for 1 hour before serving to maintain optimal flavor.

✨ 🍩 Homemade donuts with various toppings 🍩 ✨ ✨

✅ Ingredients:
For making the dough:
-500 g wheat flour
-7 g dry yeast
-250 ml warm milk
-50 g of sugar
-1 egg
-60 g melted butter
-1 pinch salt
-1 teaspoon vanilla extract
For frying:
-Vegetable oil (in sufficient quantity).
-Ingredients and garnishes
-Melt chocolate (dark, white and milk) 🍫
-Strawberries, pistachios and dried fruits 🍓
-Cookies and various chocolates 🍪 🍬
-Colorful sprinkles and sugar decoration ✨ -Colorful sprinkles and sugar decoration. ✨
✅ Description:
Prepare the dough:
-In a bowl, combine the yeast with the warm milk and sugar. Let sit for 10 minutes.
-Add eggs, melted butter and vanilla and mix well.
-Add flour and salt and knead until the dough is smooth and elastic.
-Let sit in warm place until the dough doubles in size (about 1 hour).
✨ To make the donuts:
-Spread out the dough and cut out circles with a cutter or glass.
-Proof for another 20 minutes to make it fluffy.
✨ Deep Frying:
-Heat oil over medium heat and fry donuts until golden brown.
-Drain on absorbent paper.
✨ Decoration:
-Dip the donuts in melted chocolate and decorate with fruit, chocolate, cookies or sprinkles to your liking.
-Allow to cool to harden the chocolate.

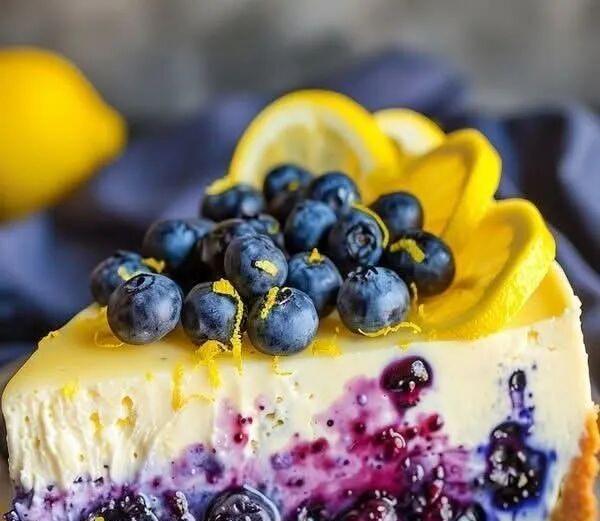
✨ 🍰 Lemon and Blueberry Cheesecake 🍰 ✨ ✨
✅ Ingredients:
For base material:
-200 g of maria or digestive biscuits 🍪
-100 g melted butter Please
For stuffing:
-500 g cream cheese (Philadelphia type) 🧀
200 ml cream (whipped cream) 🥛 -3 eggs 🥚
-3 eggs 🥚
-150 g of sugar
Juice and zest of 1 lemon 🍋 -1 teaspoon vanilla extract
-1 teaspoon vanilla extract
-150 g fresh blueberries
✨ For decoration:
-Fresh blueberries
Lemon peel 🍋 -Lemon peel 🍋
-Lemon slices 🍋
✅ Description:
Prepare the substrate:
-Crush the biscuits into a fine powder.
-Mix with melted butter and spread on the bottom of the spring mould.
-Press well and chill for 15 minutes.
✨ Prepare the filling:
-Beat cream cheese with sugar until smooth.
-Add eggs one by one, beating well after each addition.
-Add the cream, lemon juice and zest, and vanilla extract.
-Stir until smooth.
-Add fresh blueberries and stir gently.
Roasting:
-Preheat oven to 160 °C (320 ° F).
-Pour the mixture over the cookie base and bake for 50-60 minutes until the center of the cookie is slightly jiggling.
-Turn off the oven, open the oven door and let it cool.
✨ Cool and garnish:
-Chill the cheesecake in the fridge for at least 4 hours (preferably overnight).
-Garnish with fresh blueberries, lemon slices and lemon zest.
Hand-kneaded water-light muscle buns

⭕ Material:
Medium gluten flour 500 g
Water 270 g (30 °C warm water)
Yeast 5 g
Sugar 10 g
Lard 10 g
⭕ Practice:
Put all the materials together and stir them with chopsticks to form dough flocks, then knead them into a ball (not smooth), cover them with plastic wrap and proof them for 10 minutes (the ball will become very soft and easy to knead after standing), and then take them out to form a smooth dough, then knead them into long strips and evenly divide them into doses, and knead each dosage for about 30 times (so that a single dosage is easy to knead).
Put about 30 degrees water in the steamer (not too hot), put the steamed buns on and cover them and ferment for about 30-40 minutes (the volume of the steamed buns is 1.5-2 times that of the original, and it bounces slightly when pressed with your fingers). After fermentation, remove the steamer, then boil the water in the pot, then put the steamer on the pot and steam for about 12-15 minutes (if the steamed buns are relatively large, you have to extend the time appropriately).
⚠ Explain the difference between first shot and second shot:
One shot: It is a more time-saving and labor-saving method, eliminating the step of exhausting, and the finished product will basically be very smooth (the key is that each dosage should be rubbed in place after dividing the dosages). It is very suitable for novice operations, and it is also more suitable for Jimei people who are working. I usually It’s all done in one shot.
Second shot: It is time-consuming, and it is easy to overdo it (novices are afraid that they can’t grasp the fermentation time well), and the exhaust will be relatively laborious. If the kneading is not in place, the surface of the finished product will be bumpy. There is basically no difference between the taste of the first hair and the second hair. As long as the first hair is kneaded in place after the dosage is divided, the steamed buns will still be very soft, the dough ductility of the second hair will be better, and the aging speed will be relatively slow. There is no other difference.
⚠ Explain about steaming with cold water or steaming with boiling water:
It can be judged according to the proofing state of the steamed buns. If the steamed buns are fully fermented, then steamed in the pot after steaming on high fire. It is easier to control and suitable for novices. If the steamed buns are not fermented in place, then they are suitable for steaming in cold water, so that the steamed buns will continue to proof during the SAIC process, which is suitable for experienced friends.
⚠ Explain how big the buns should be:
The buns made by Xiaobian are relatively small (suitable for children). Generally, I will make 12 of 500 g (sometimes 24 of pure meat buns), so that when steaming, it will be just one pot or two pots. The size of the buns depends on personal preference. The medium buns on the market are generally 60 g-70 g. If the buns are bigger, the steaming time will be appropriately extended.
[Warm Tips]
When making Western-style pastries, commonly used cups and tablespoon/teaspoon are standard units of capacity, which are mainly used to measure the volume of ingredients, rather than directly expressing weight. To convert these capacities to grams (g), it needs to be calculated based on the density of the specific ingredient, because the weight of different ingredients varies greatly.
Here are the approximate weights of some common ingredients for reference:
Cup Weight Conversion
1 cup = about 240 milliliters (mL), but the grams depend on the ingredients:
all-purpose flour: 1 cup ≈ 120-130 g (depending on the degree of compaction)
granulated sugar: 1 cup ≈ 200 g
brown sugar: 1 cup ≈ 220 g (lightly pressed)
butter: 1 cup ≈ 227 g
milk: 1 cup ≈ 240 g
water: 1 cup ≈ 240 g
Spoon weight conversion
1 tablespoon (tablespoon, tbsp) = 15 ml
Flour: 1 tablespoon ≈ 8-10 g
White sugar: 1 tablespoon ≈ 12.5 g
Cream: 1 tablespoon ≈ 14 g
Water: 1 tablespoon ≈ 15 g
1 teaspoon (teaspoon, tsp) = 5 ml
Flour: 1 teaspoon ≈ 3-4 g
White sugar: 1 teaspoon ≈ 4 g
Salt: 1 teaspoon ≈ 6 g
vanilla extract: 1 teaspoon ≈ 5 g
Notes
Status of ingredients: For example, whether the flour is sifted and whether the sugar is compacted will affect the weight.
Precise measurement: If the recipe calls for precision, it is recommended to use an electronic scale to weigh directly, rather than relying entirely on cups or spoons.
Regional differences: This refers to the standard cup (240 mL) commonly used in the United States, other regions (such as Australia, 1 cup = 250 mL) may vary slightly.
If you have a more accurate conversion method, please tell me!
![[Baking novices can also become masters in seconds] No need to knead dough! 3 kinds of ultra-simple and healthy cakes and breads, breakfast and afternoon tea are off the charts!](https://heradsmobi.top/wp-content/uploads/2026/01/4f8b60b6941f5fe76b79b17a6133823a.jpg)